I just love saltwater patterns! They have inspired my pike flies for many years, and to be honest, saltwater fly fishing is just awesome (especially if you have the chance to get your fly in warm salty water...)
This is a tutorial on how to make an articulated squid with extra movement from the synthetic shammy leather tentacles.
I got to play a lot with different heads from Spawn Fly Fish and i really like them.The fact that they sell them blank as well is an added bonus as i like to customize my ties as much as possible.Go check them out as they innovate all the time and release new heads on a regular basis.
Pretty much everything is explained on this video, i changed a bit the content of my tutorials, and now they come with voice over. It saves me a lot of time in editing, i can explain things with more details and i have no worries for the musical copyrights...
I really hope you guys like it, and i have a few more planned for the near future.
Let me know in the comment section of the video if you want to see something in particular.
Here's a link to the materials i use:
Squid heads: www.spawnflyfish.com
Body fiber material: www.flytyersdungeon.com
Hooks: www.konafishingproducts.com
Eyes: www.flymenfishingcompany.com
Tentacles/tails material: Ebay link
Vice: www.forceflyfishinginc.com

Wednesday, November 28, 2018
Sunday, October 14, 2018
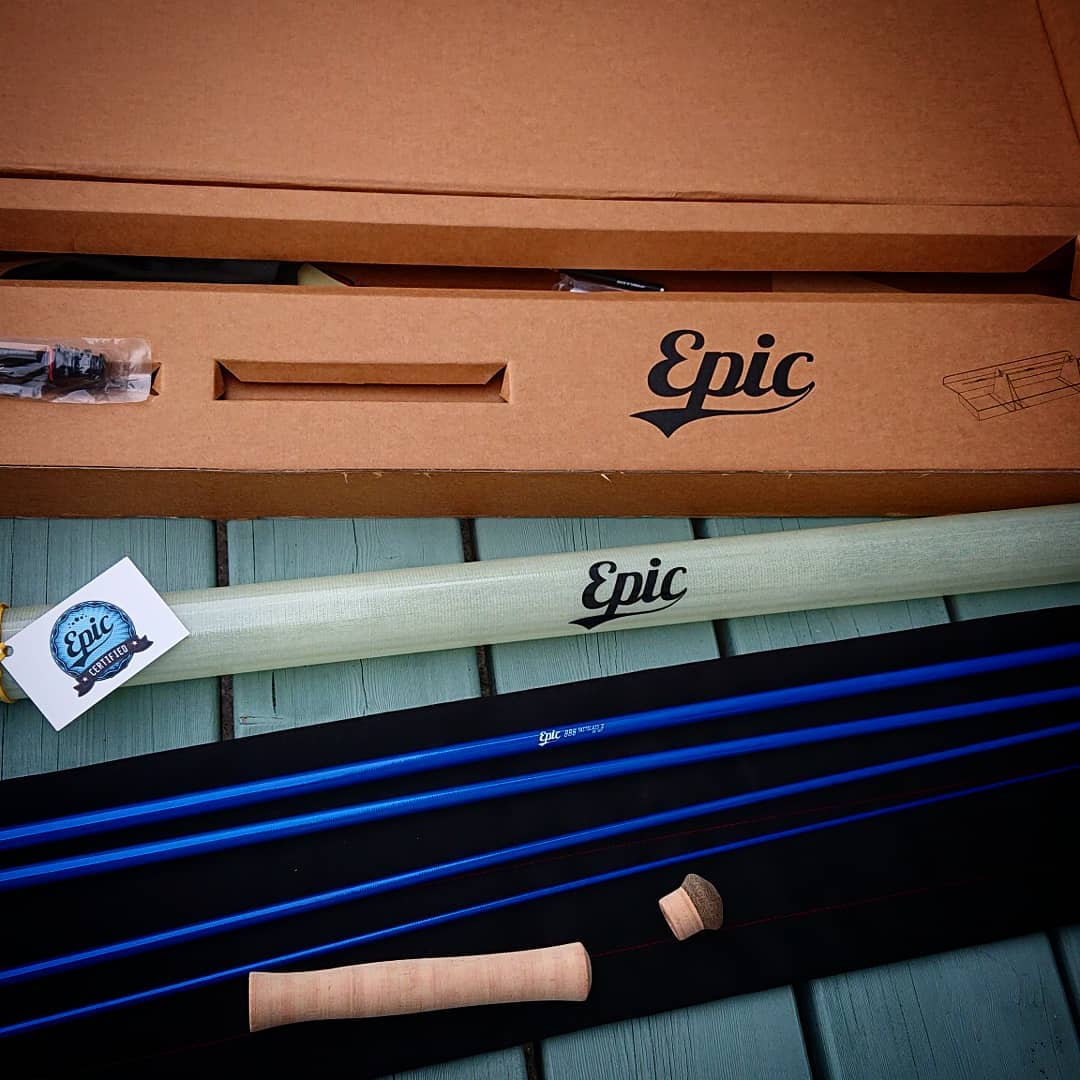
Rod building Part 4 , wrapping and finishing.
The final part in this series, i tried to keep it as simple as possible. If any doubt with your built,always check the manual that comes with the kit, its very detailed and should clear any questions.Alternatively you can always send a mail to the Epic crew, i'm sure they will assist you in any way they can.
My tips for building your rod...Read the manual, take your time, if it doesn't look good you can always do the wraps again. Make sure everything is correct before you start the epoxy! Once you apply the epoxy on the wraps, its too late to go back...Well you can , but it's adding extra headaches that you don't really need at this point.
Your build is your build, even with little imperfections (mostly them damned bubbles in the epoxy) it will not change the performance of the rod.So don't be afraid and take the jump! Build your own rod!
I was once told there is three important moments in your fly fishing career, the first fish you catch on a fly rod, the first fish you catch with a fly that you tied, and the first fish you catch with a rod that you built...
Tuesday, October 09, 2018
Saturday, October 06, 2018
A little update...
Since my return from Alaska, i have kept the blog on the quiet side.... The pike season is back on here, i have been doing some river guiding in August and September, and now we are well into October and the lodge is running at full steam.Its a strange and difficult season, mostly due to the very dry summer we had.The water levels are still very low, we need them to rise to their winter levels soon for the fishing to improve drastically.
But i am very proud to share some good news, after my return from the Innoko, i was contacted by Carl McNeil, CEO of Swift Flyfishing all the way from New Zealand. Swift fly fishing make my absolute favorite rods.I have been fishing glass rods for the last five years, and i simply cannot go back to graphite/ carbon rods. So it was a huge surprise to me when Carl sent me a message wanting to welcome me to their brand ambassador program. Of course without any hesitation i gladly accepted. So yes you guessed it, you are going to see a lot more fiberglass on this blog!
To start off, i just received an 8 weight kit and i am starting to put it together at the moment. I am filming the whole process for those who want to plunge in the deep end and make the move to glass rods and rod building.
First a little unboxing video:
And how to fit the reel seat and handle:
 |
| The Bandit rod still slaying fish! |
 |
| The T-bone...T-boned... |
 |
| I love October! |
Friday, August 17, 2018


Monday, August 13, 2018
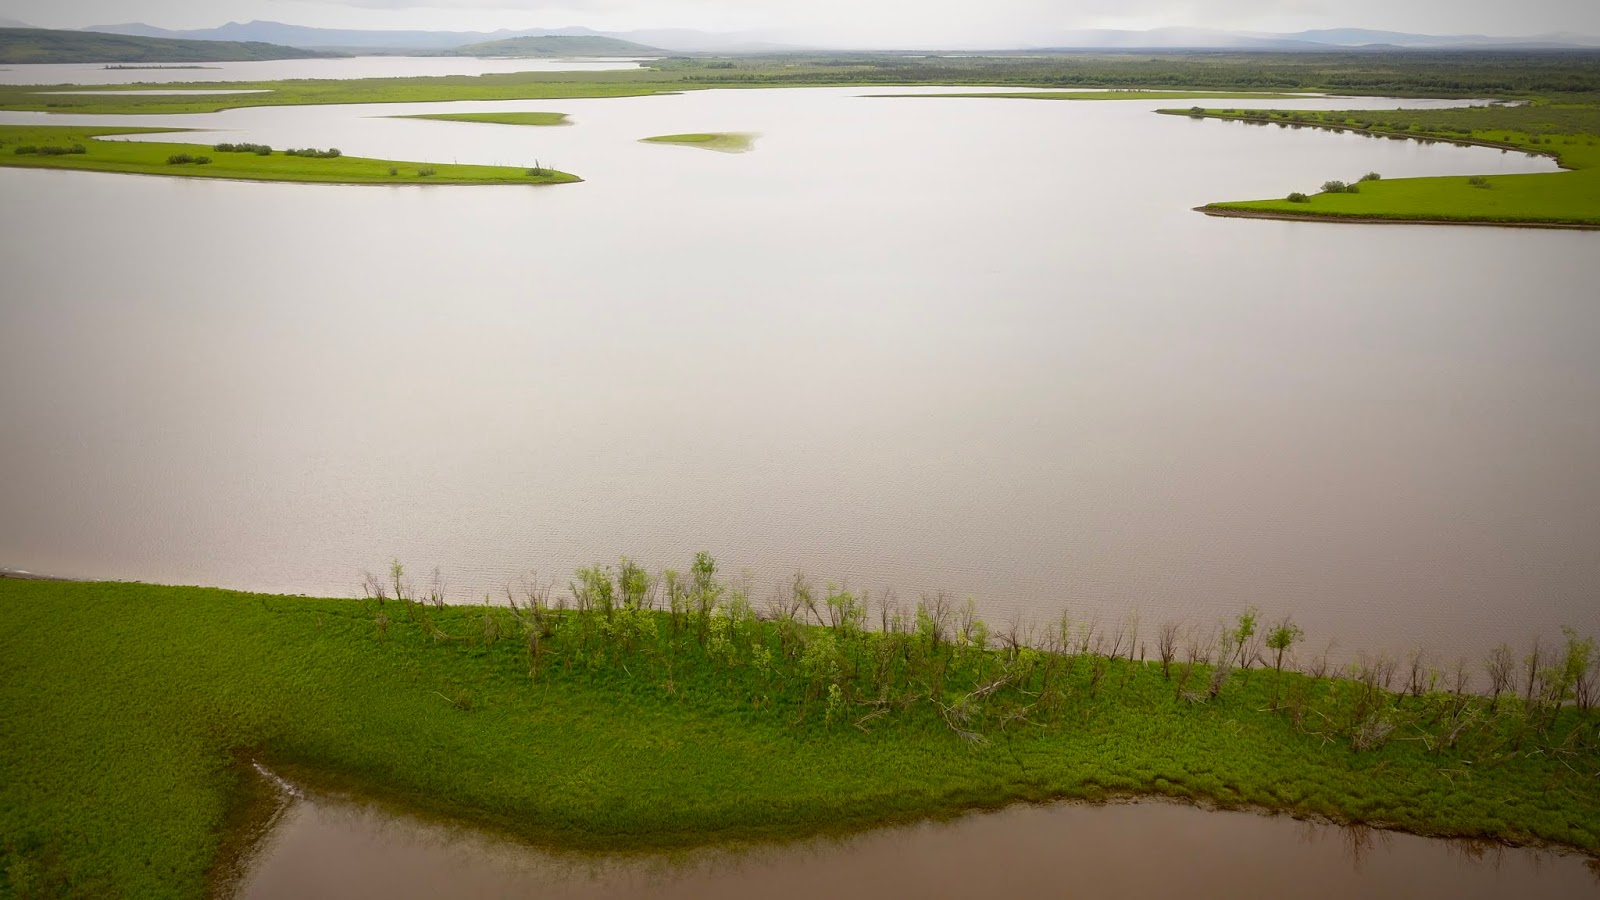
Innoko/Alaska 2018
We done it again!

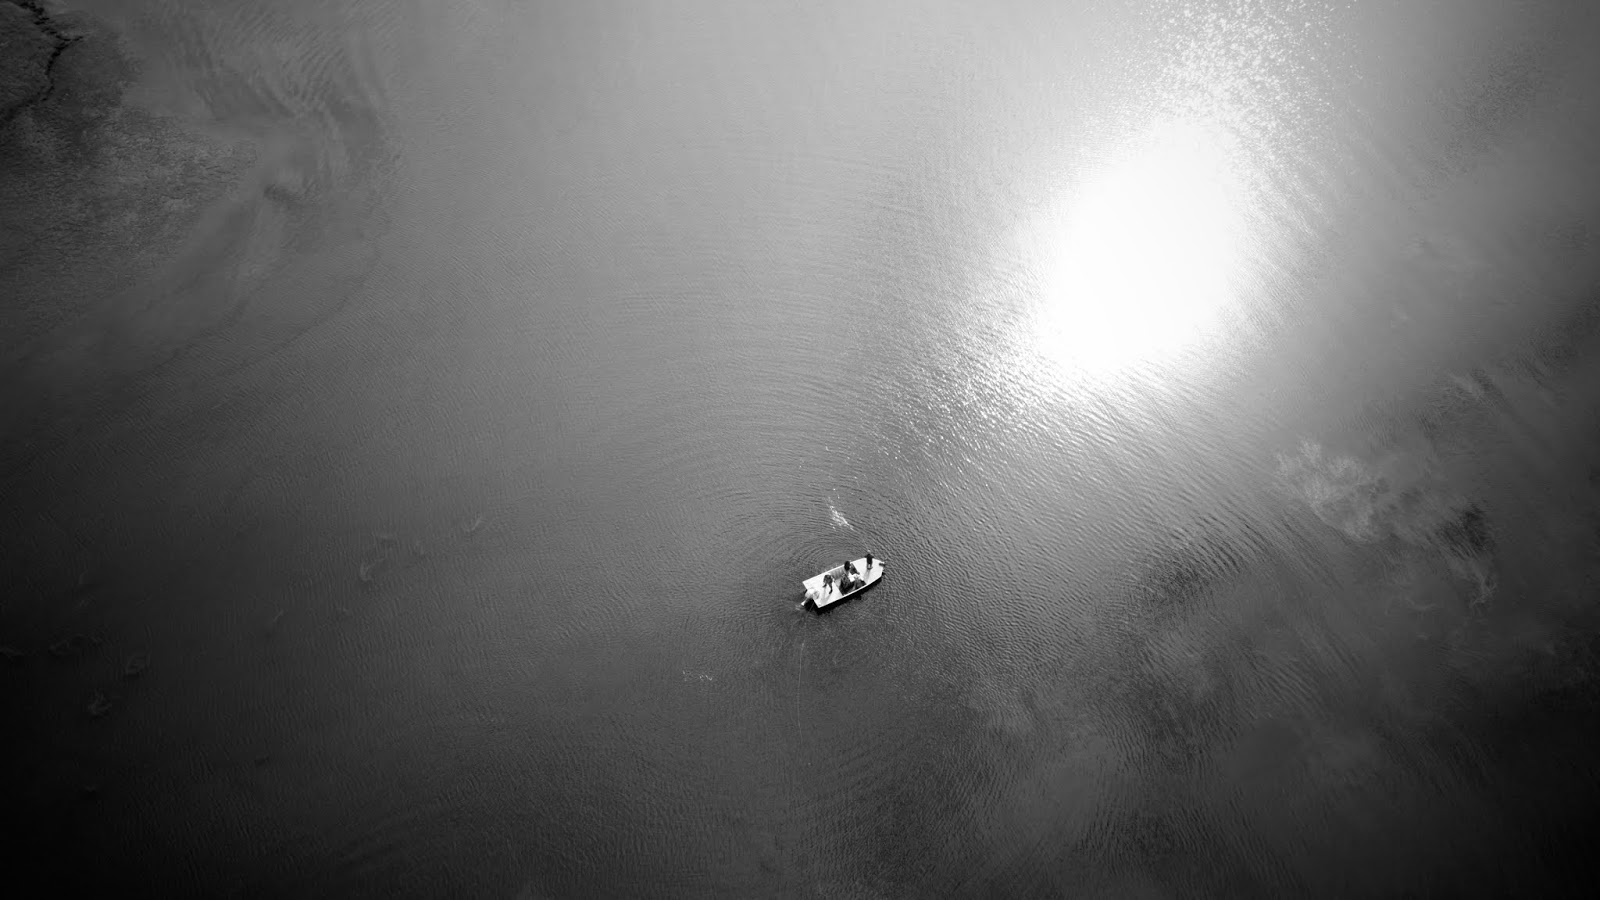
Back from the land of the giant pikes! Where they grow slow, old and big!! Many people think we go there to get 50lbs pikes, but this is not the case. We have pikes as big here (Europe) if not bigger than Alaska, but its the huge amount of large pikes that makes this fishery soooo special!
Over there you are only interested in fish over 40 ( 103cm) , and by the end of the week if you are lucky to find good light, descent water clarity and not too much wind, you can sight fish for pike! Like the flats in tropical waters. The guide is such an asset to catching fish. More used to spot the big girls then you, they can put you onto THE fish. You might see a smaller one (110cm) and take a cast at that fish, but maybe behind there is that elusive 50 (130cm) sitting a little deeper. If the smaller fish takes your fly it's game over. It will surely spook that 50! And this is why we make that 20 000kms round trip, to catch trophies and not numbers. This is when the guide comes into action, they spot the fish, place you at the best angle and it's up to you now...Just don't f*ck up your cast and set that hook hard!
My boat partner, Dominique had a 47 (120cm) like this right beside the boat, about 5, 6 meters away from us! To see such a monster sit there, casting that little bunny fly...The fish turns! Its showing an interest....Heart pumping at this stage, one strip and she engulfed the fly right in front of our eyes! Unforgettable moment!


This is a reason i don't mind having the guide holding the fish on the picture, he's part of the team, part of the memories on that special day. European anglers want to hold their fish at all cost for some reason...And more than often pride and big ego comes before fish welfare... Fish are dropped on the ground, in the bottom of the boat, left out in the air way too long, passed to friends (yes, i have seen it many times).
So the fact that the guide hold your fish is primarily for the fish welfare and to get a perfect photo. Sure you can have a pic with your fish, but this has to be done outside the boat, in shallow water (never over dry land!) away from a bear...or a wolf..and i see all this messing around as waste a lot of precious fishing time, i rather a quick pic with the guide, a fast release and back to casting asap! It's a short week up there 5 1/2 days fishing, every minutes count.


That short week will beat you up, and those pikes will pound you to the ground, especially those 35's ( 90cm) my god they can go! They will rip line of your fingers like you never seen it before! Powerful runs, but what makes these runs special is how long they can go before you can put a stop to it.
And your tackle will be tested! 4 out of 6 guys had broken something, rods, lines, rings, hooks opened.This is why the leaders you can use have to be approved by the guides, no swivels or clips ( i had a fastach #3 crushed and one opened up and this has never happened to me here in Ireland).
Leaders are so simple, 5ft of nylon coated 65lbs 7x1 stainless steel, straight from your fly line to your hook. Flies are tied directly to the wire ( I do this often here, resulting in less problems and headaches).


This time was different that 5 years ago, colder, water a lot lower. Fast changeable weather, and a large pink salmon run.You could see pinks everywhere, swimming like zombies in the last leg of their lives. Even the air stank of rotten fish in some places. So the pikes were very well fed, resulting is so many frustrating follows of monster fish. I was getting an average of at least 20 follows a days of fish over 45s (110cm+). On the plus side the ones that we got were soooo heavy!!! Big bulging bellies full of pinkies!


As for numbers, we had so many fish, around 30 fish a day for the worse days for me and Dom and 60+ fish each on the best ones! Include a good dozen over 40, two three over 45 and you have the makings for a fantastic week! But it's average for up there, with such a massive body of water that's frozen for 7/8 months and only six rods a week, the fish are wild, untamed and in massive numbers.
This is why I'm already planning my next group to go up there... Alaska the last frontier, has a weird but beautiful grip on us.
A usual, i try to film a bit as well, it's not easy combining fishing and filming, but i do enjoy both, hope you do too!
And while i have you on Youtube, give the video a like and give a subscribe to help this channel grow, many thanks!
Saturday, April 14, 2018
GoPro slow motion test.
I simply couldn't wait to try the new slow motion on the Gopro 6. Full HD 1080 with an amazing 240 fps. And the voice activation is fantastic!
Friday, April 13, 2018
Cameras and fly fishing, a personal evolution.
Since its first release, i have been a big fan of Gopro. They are small, tough, waterproof and with getting the settings right the videos and pictures are great.
I owned three gopros: the very first one, the number 3 (that one was not great) the 4 black and now the 6 black.
I didn't need to upgrade every year, but instead i waited for a big leap in technology and software.
The 6 fits all this, 4k at 60fps, and a slow motion thats amazing for such a little piece of gear, 1080 at an amazing 240fps, voice activation and many other goodies are packed in this tiny camera.
Over the years, i have tried many different set up, trying to find the right balance between practicality and quality of videos/pictures.
From a DSLR (Lumix GH-2) + spare lens, a point and shoot camera (i do take this one when travelling, Lumix LX100) to the Osmo+ from DJI.
The Gopro was always by my side, 80% of the time. Yes it can rain a lot here in Ireland, and when you need the camera to be rolling, it has to be rolling, rain or shine.

I recently got back into vlogging, and was starting to look at the possibility in using the gopro.One big problem was the awful sound quality on the camera. Even the newer models that don't need the housing for waterproofing have a dreadful sound.
To solve this problem all that's needed is to hook up an external mic. Ok it's not waterproof anymore, because the side door has to be open to plug the mic adapter but at least you can plan the "talking shots" during the dry spells.
Gopro being Gopro, they had to fuck up somewhere along the way...No mic port on the camera, instead you have to buy an ADAPTER on their website for the extortionate price of 64.99€!! (but if you look around you can find cheaper, i got mine for 40€).
In the last week, i did put a pic of the new set up on social media and a good few asked for details, so there's my set up:
Start with a good support, you cannot go wrong with a Gorilla Pod from Joby. You can use it as a selfie stick, a stable tripod for time lapse, or wrap it around anything you can to create interesting shots or when its impossible to sit it correctly (moving vehicle, wind...)
Make sure to have the tripod equipped with a Ball Head, this will help to keep you shot level no matter how the tripod is set up.
Then add a Tripod mount for Gopro, easily found on ebay for very little money.


Now an aluminium skeleton frame housing to hold and protect the camera.The case need to have an opening on the side to allow the side door to open fully and to be able to plug in the mic adapter. The best case are surprisingly cheap, strongly built, with a cold shoe mount on top for the mic and a 52mm UV filter.This filter can be unscrewed and you can use different filters. I mainly use ND filters (neutral density) and polarised.The 52mm also keep your Gopro lens well protected from scratches.
To top the set up all we need is a mic (and that stupid adapter). For best results and something that doesn't take too much room i use the RODE Video Micro.


I believe this set up is going to be my main one now for general vlogging and filming.For larger project and travels i always include in my bag the point and shoot Lumix LX100 for those more artistic B rolls & hero shots and of course the Mavic pro for aerial shots.
As for the gopro 6, its now voice activated, even better!
For the mic placement be aware that once you put the dead cat (that fluffy wind breaker) on the mic, it will be inside the shot because of the wide angle. To correct this, the bottom plastic nut to secure the mic on the cold shoe is surrounded by grooves to hold the wire in place. Just pull the back of the mic downward and secure the wire in place inside on the the groove.Your mic is now pointing slightly upwards and doesn't obstruct the frame.
Have an other solid 8 weeks of work here at the lodge, and i hope to test all this properly once i have more spare time.This set up will be brilliant especially when you are restricted on room and weight while travelling abroad.
I owned three gopros: the very first one, the number 3 (that one was not great) the 4 black and now the 6 black.
I didn't need to upgrade every year, but instead i waited for a big leap in technology and software.
The 6 fits all this, 4k at 60fps, and a slow motion thats amazing for such a little piece of gear, 1080 at an amazing 240fps, voice activation and many other goodies are packed in this tiny camera.
Over the years, i have tried many different set up, trying to find the right balance between practicality and quality of videos/pictures.
From a DSLR (Lumix GH-2) + spare lens, a point and shoot camera (i do take this one when travelling, Lumix LX100) to the Osmo+ from DJI.
The Gopro was always by my side, 80% of the time. Yes it can rain a lot here in Ireland, and when you need the camera to be rolling, it has to be rolling, rain or shine.

I recently got back into vlogging, and was starting to look at the possibility in using the gopro.One big problem was the awful sound quality on the camera. Even the newer models that don't need the housing for waterproofing have a dreadful sound.
To solve this problem all that's needed is to hook up an external mic. Ok it's not waterproof anymore, because the side door has to be open to plug the mic adapter but at least you can plan the "talking shots" during the dry spells.
Gopro being Gopro, they had to fuck up somewhere along the way...No mic port on the camera, instead you have to buy an ADAPTER on their website for the extortionate price of 64.99€!! (but if you look around you can find cheaper, i got mine for 40€).
 |
| 65€??? |
In the last week, i did put a pic of the new set up on social media and a good few asked for details, so there's my set up:
Start with a good support, you cannot go wrong with a Gorilla Pod from Joby. You can use it as a selfie stick, a stable tripod for time lapse, or wrap it around anything you can to create interesting shots or when its impossible to sit it correctly (moving vehicle, wind...)
Make sure to have the tripod equipped with a Ball Head, this will help to keep you shot level no matter how the tripod is set up.
Then add a Tripod mount for Gopro, easily found on ebay for very little money.


Now an aluminium skeleton frame housing to hold and protect the camera.The case need to have an opening on the side to allow the side door to open fully and to be able to plug in the mic adapter. The best case are surprisingly cheap, strongly built, with a cold shoe mount on top for the mic and a 52mm UV filter.This filter can be unscrewed and you can use different filters. I mainly use ND filters (neutral density) and polarised.The 52mm also keep your Gopro lens well protected from scratches.
 |
| Side door opens easily for the mic adapter. |
To top the set up all we need is a mic (and that stupid adapter). For best results and something that doesn't take too much room i use the RODE Video Micro.


I believe this set up is going to be my main one now for general vlogging and filming.For larger project and travels i always include in my bag the point and shoot Lumix LX100 for those more artistic B rolls & hero shots and of course the Mavic pro for aerial shots.
- One tip for taking pictures of you and a fish when you are alone, is to set the gopro on time lapse pictures. I set mine to take one picture every second.When your trophy fish is safely in the net, you can clamp your camera and press shoot, this will take a picture every second.Only then you can take the fish out of the water and strike a few pose without the worry of waiting on a timer. By doing this you will end up with way too many pictures, and most of them will be crap, but in that bunch you always have a couple that are top quality, and some pics can be unexpected as well, especially if you let the camera roll while releasing the fish. Just remember to always be in the shot...After a few trials, you will know how far to hold the fish from the lens.Too far and you will see nothing, too close you just look like you're trying hard to make your fish look bigger...Always shoot on wide and not superwide for the hero shot.
As for the gopro 6, its now voice activated, even better!
For the mic placement be aware that once you put the dead cat (that fluffy wind breaker) on the mic, it will be inside the shot because of the wide angle. To correct this, the bottom plastic nut to secure the mic on the cold shoe is surrounded by grooves to hold the wire in place. Just pull the back of the mic downward and secure the wire in place inside on the the groove.Your mic is now pointing slightly upwards and doesn't obstruct the frame.
 |
| The dead cat will show on screen if left like this. |
 |
| Just pull it back and secure the wire.Its now out of the way . |
Subscribe to:
Posts (Atom)